Best Probiotic Live Grain Milk Kefir: Dermatologist's Instructions & Information

For the best probiotic, live grain milk kefir is what I depend on for the health of my gut microbiome. Home brewed kefir milk is truly a probiotic powerhouse and my first choice for probiotic therapy. Microbial diversity in home brewed kefir is far richer than commercial kefir, which is often made from preserved cultures that contain less microbial diversity.
Kefir is more complicated than yogurt and the health benefits are far reaching.
Kefir grains are a traditional example of the co-existence of bacteria and yeasts and the importance of this symbiotic relationship seems clear, since it is necessary to produce compounds beneficial to health. (1)
Kefir's historical benefits are responsible for its continued presence in culinary traditions. Kefir originated in the Northern Caucasus but similar fermented milk products were found in Europe, the Middle East and Asia. Kefir is nutrient rich in protein, calcium, vitamin B12, niacin, and folic acid. (2). The bacteria also trap toxic substances like mercury and prevent your body from absorbing them. The microbial magic is much farther reaching and not entirely understood.
Some of the proven health benefits of kefir consumption include:
- reduction in traveler's diarrhea (I can attest to that)
- reduction of Helicobacter pylori infection
- reduction in food born illnesses
- suppression of gut bacteria that turn pro-carcinogens into carcinogens and lower rates of colon cancer
- stimulation of the immune system via a number of mechanisms
- reducing food allergies
- reducing blood sugar, lipids and high blood pressure (2)
- anti-inflammatory (1)
Add to this the new research on healthy gut microbiome and benefits to the gut/brain axis including the aiding in the reduction of depression, stress reactions, anxiety and reduction in obesity, diabetes and atherosclerosis.
Dermatological benefits of a healthy guy microbiome are now well established and an area of active research. It's called the gut/skin axis. The 'how' is not fully understood yet but identifying the 'what' is a growing area of scientific research.
Though not yet fully explored, the mechanisms by which intestinal microbiota exert their influence on skin homeostasis appear to be related to the modulatory effect of gut commensals on systemic immunity. (4)
Skin problems associated with gut microbiome problems aka dysbiosis and skin dyshomeostasis.
Again, the mechanisms are complicated but one explanation is that skin becomes more permeable and skin immunity does not work like it should. Skin conditions associated with an unhealthy gut microbiome include:
- Acne vulgaris,
- Atopic dermatitis,
- Psoriasis.
I am not surprised and I expect the list to grow exponentially.
Dermatologist Dr. Cynthia Bailey’s Recommendations for Home Brewed Kefir:
 I originally wrote this article in 2009 and have been a probiotic food kefir advocate since long before that time. I know that we are what we eat - for better or worse. I know that the human body is far from sterile and if you don't put out the welcome mat for the good guys you get a bunch of bad guys squatting on your precious anatomy and altering your precious physiology. That's why I'm teaching you how to make home brewed kefir. Dermatologist and Skin Wellness Expert Dr. Cynthia Bailey
From my study, kefir contains a broader range of beneficial probiotic organisms than other cultured foods or probiotic capsules. The probiotics in home brewed kefir are alive and ready to immediately get to work improving your health and thus the vitality of your body and skin.
Everyone benefits from probiotics, but especially people who have had antibiotics in the past. (If you are immunosuppressed or have intestinal disease, please consult with your physician to supervise your probiotic therapy.)
Before I give you my kefir tips, I want you to know that I'm dedicated to natural health from the inside out and the outside in. - Dr. B
 Click here to see my truly natural skin care products!
Doctor's tips for making probiotic-rich home brewed milk kefir
Home brewed kefir is an easy and inexpensive way to get abundant probiotic goodness.
It’s been done for thousands of years in kitchens all over the world. Below is my method for making home brewed kefir milk in my kitchen. You can find additional instructions from the web sites I reference at the end of this post.
Materials that I use to brew kefir:
 All of your kefir brewing materials need to be glass, ceramic, plastic or silicone. Kefir grains (colonies) don’t do well if they come into contact with metal. To the left you see the simple materials that I use to brew kefir in my kitchen. These materials include:
- A bottle with loose fitting lid for storing the culture between brewing (like a pint sized, hinged canning jar with the rubber seal removed)
- A bottle and lid to store your brewed kefir milk (like a quart-sized wide mouth canning jar and a fitted plastic lid)
- A brewing container like a 4 cup Pyrex measuring cup and plastic spoon to ferment and stir kefir at room temp while it brews
- Plastic funnel and silicone strainer to decant the grains from the kefir after brewing

Note that there is no metal involved - no metal lids, funnel, spoon, -everything is plastic, silicone or glass.
How to activate your kefir grains for the first brew:
- When you receive your live kefir grains, inspect them. They should be lumpy creamy yellow and moist. Bring them to room temperature for several hours and then you are ready for your first brewing to awaken your culture (for more detailed instructions see my step by step instructions below for brewing kefir to drink).
- Place your newly arrived grains in about 1 cup of room temperature milk (not cold) into a non-metal container like the Pyrex measuring cup. You can use goat, cow or sheep milk. If you want to use plant-based milk you can use soy milk or coconut milk. Nut milk may work too but I have never used it. Whole fat mammalian milk is best for the vigor of your colony. It can be pasteurized or raw. I use goat milk and have also kefired soy milk and coconut water with my kefir grains.
- Add a small pinch of sugar to invigorate the little culture grains after their journey.
- Place the Pyrex cup with the milk and culture in a dimly lit location (not direct sun, but not necessarily dark either). I think that they like your company so put them somewhere in your kitchen where you will pass by them for a little stir every now and then. Cover the Pyrex cup with a clean kitchen towel while the kefir grains are working.
- Allow the culture to sit for about 36 hours. Swish it or stir it with a plastic or wooden spoon often, and talk sweetly to it.
- The kefir is ready when it has lumps all the way to the bottom of the container and is slightly thick like a milk shake.
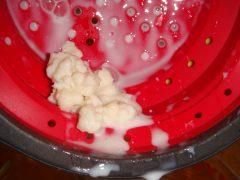
- To strain your first brew, use a NONMETAL strainer (like plastic or silicone) or a slotted plastic spoon with very small holes to strain the milk from the grains. Place the strainer on the funnel over your storage bottle. Pour the brew from the Pyrex into the strainer. Gently shake the strainer to separate the kefir grains from the curds of the milk.
- Place the grains in a clean Pyrex cup with about half of the kefired milk from this first brew batch (throw the rest of this first batch of milk away, don’t drink it). This is your little powerhouse kefir culture. You are now ready to brew kefir to drink for years to come!
Tips on how to brew kefir to drink:
Kefir is an ancient food and has been brewed in many varied conditions, in many countries and climates. Information about brewing is also varied, though there are some important points for kefir brewing that everyone seems to agree on.
5 important points about successfully brewing kefir:
- Never expose your grains to metal.
- Don’t squish your grains.
- Don’t expose your grains to chemicals including detergents.
- Don’t place your grains in direct sunlight.
- Feed your grains mammal’s milk every now and then or they will get weak (this is only important for people fermenting soy milk or other non-mammal milks).
I am not as fastidious about providing the temperature conditions for my kefir brewing that others recommend and my kefir quality seems to be consistent with what others describe. At the end of my instruction I list other authors so that you can compare instructions.
My process to create home brewed kefir.
This is how I brew my kefir and it seems to work fine for me:
- Place about 1¼ cup room temperature milk (I actually use cool milk from the fridge and haven’t noticed any problems) into your Pyrex measuring cup (or ceramic jar or bowl). The amount of milk you add may depend on the volume of your grains. Some sources recommend a ratio of about 1:10, meaning if your grains are 1oz. you add about 9 oz of milk. I don’t actually worry about ratios and it has worked fine for me every time. Eventually, as your culture grows you will be able to brew a full 4 cups in your Pyrex.

- Cover the container with a clean kitchen towel and place in a dimly lit location in your kitchen. Kefir colonies should not be placed in direct sunlight.
- The ideal temperature for brewing kefir is between 72 to 86 degrees F. Kefir brewing heating pads are available if your kitchen is cooler than 72 degrees. My kitchen is probably about 65 degrees and my kefir seems rich and fine, so again, I’m not sure how much the temperature affects brewing and kefir quality.
- Gently shake or stir your brew with nonmetal utensil as often as possible. Honestly, I can only do this about 2 times in a 24-hour period.
- Your kefir will be ready in about 24 hours; it will be thicker than milk and slightly lumpy all the way through the container. If you have chosen to use lower fat milk, your brew will have a layer of watery separation. If you have warm conditions and a lower volume of milk to grains, your kefir may be very thick like a mousse.
- Strain the milk from the grains by placing the plastic funnel on the wide mouth quart canning jar. The strainer goes on top of the funnel. Pour your brew into the funnel. The milk falls into the canning jar and the grains collect in the funnel.


- Leave some of the ‘slimy’ liquid with the grains. Place the grains into their resting refrigerator jar with a loose-fitting lid. I use the hinged pint canning jar.
- To store your grains in their resting jar, add about 1 cup of new milk to the jar containing your grains and put them in the fridge. This next image is the kefir grains and milk ready to go into the fridge to rest until the next brew. The colony needs this milk to 'eat' between brewing cycles. Remember, they are alive and need nutrients to live on.

- You can store this little colony in the fridge without changing the milk for up to a week (maybe even 2 weeks) until you are ready to make a new batch of kefir. If you are going to be gone, have someone change the milk every week by repeating the straining step just described. (See storage info below.)
- Your kefired milk is ready to drink. Store it in the fridge.

Kefir brewing tips that I’ve learned over the years.
- Your kefir culture will improve its ability to ferment milk over time. After about 5 brewing cycles, your little colony will be able to ferment a larger volume of milk (perhaps 60 times its own volume) in 24 hours. Initially, ask your new culture to only ferment about 1 ½ cups at a time. I brew 4 cups in 24 hours at room temperature which for me is between 65 and 70 degrees.
- Play with the fermentation time to find the taste and consistency you like. Longer brew times and smaller milk volumes will make a thick kefir with a carbonated taste.
- Kefir storage: Store your brewed milk in the refrigerator and drink at least a small glass every evening.

- As your colony grows, give some away. Teach others how to brew kefir and send your little guys off to a new home for others to enjoy and benefit from.
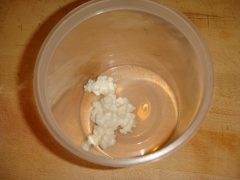

Kefir grains in their transport container with a little fresh milk for the journey
Final words to ponder about probiotic rich foods from Dr. Cynthia Bailey.
Have you heard of fecal transplant treatment being successful for a variety of medical conditions? Well it's trending. I say, why not just start eating probiotic rich foods and stewarding our intestinal microbiome daily with kefir and other probiotic rich foods.
Help your intestinal microbiome (previously called the enterobiom) thrive by eating the prebiotic foods they need such as beans and fresh fruits and veggies. In the end (pun intended) you will look and feel better than ever before - why not give it a try!
If you found this post helpful, you may like to read these other posts:
Kefir Helps to Support Healthy Skin - Dermatologist’s Kefir Probiotic Recommendations
To learn more about my natural skin care products, click here.
Reference:
1. de Oliveira Leite AM, Miguel MA, Peixoto RS, Rosado AS, Silva JT, Paschoalin VM. Microbiological, technological and therapeutic properties of kefir: a natural probiotic beverage. Braz J Microbiol. 2013;44(2):341–349. Published 2013 Oct 30. doi:10.1590/S1517-83822013000200001
2. Renewed Interest in Kefir, the Ancient Elixir of Longevity
by Elinoar Shavit, www.medicinabiomolecular.com Volume 1:2 Summer 2008
3. Hills RD Jr, Pontefract BA, Mishcon HR, Black CA, Sutton SC, Theberge CR. Gut Microbiome: Profound Implications for Diet and Disease. Nutrients. 2019;11(7):1613. Published 2019 Jul 16. doi:10.3390/nu11071613
4. Salem I, Ramser A, Isham N, Ghannoum MA. The Gut Microbiome as a Major Regulator of the Gut-Skin Axis. Front Microbiol. 2018;9:1459. Published 2018 Jul 10. doi:10.3389/fmicb.2018.01459
5. Mohajeri MH, Brummer RJM, Rastall RA, et al. The role of the microbiome for human health: from basic science to clinical applications. Eur J Nutr. 2018;57(Suppl 1):1–14. doi:10.1007/s00394-018-1703-4